Hi Postman Team,
I’m a new user learning how to use Postman and recently tried your Basic Auth example from the Postman Echo collection.
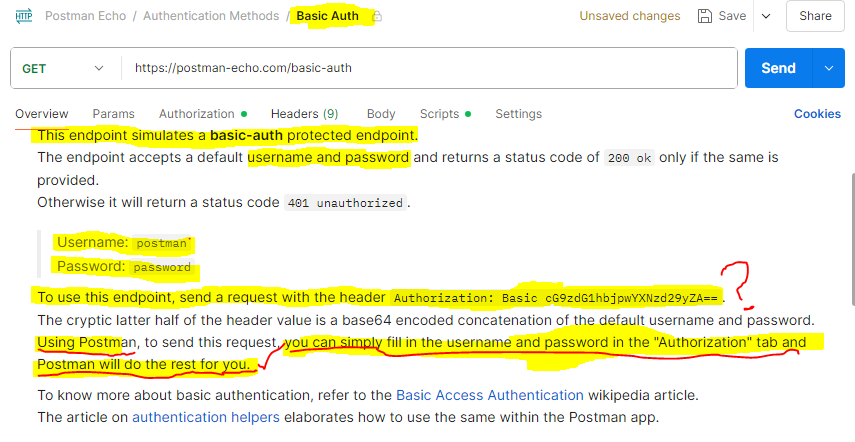
I carefully followed the instructions, which included this line:
“To use this endpoint, send a request with the header Authorization: Basic cG9zdG1hbjpwYXNzd29yZA==”
As a beginner, I interpreted that Base64 string (cG9zdG1hbjpwYXNzd29yZA==) as the password, and entered it directly in the password field under the Authorization tab. This led to a 401 Unauthorized error, even though I followed the documentation exactly.
It turns out the Base64 string is just a representation of postman:password for the final header—and users are actually supposed to enter:
- Username:
postman
- Password:
password
Postman then handles the Base64 encoding internally.
This was very confusing, and I imagine other beginners may run into the same issue.
SUGGESTION
Could you update the documentation to clearly state:
- Do not paste the Base64-encoded string into the password field
- Instead, enter the raw username and password, and let Postman encode it
- Perhaps include a side note for advanced users about how the encoded string is built (optional)
This small clarification would go a long way toward helping beginners have a smooth learning experience and avoid frustration.
Thanks for an otherwise great product and learning experience so far!
Kind regards,
beatlesrbest
Hey @beatlesrbest 
Thanks for contributing in the community!
For this action:
“To use this endpoint, send a request with the header Authorization: Basic cG9zdG1hbjpwYXNzd29yZA== ”
You would have only needed to directly input that into the Request Headers section:
Hi Danny,
Yes, thats what I thought and I tried that and it didn’t work for me. I actually received a 401 Unauthorized result. See below.
Or, have I missed something?
Could you share the Public Collection that you’re working with, please?
Absolutely! 
I’m working through Postman Echo / Authentication Methods / GET Basic Auth tutorial. See below..
You should be able to share the direct link to that by hovering over the name in the breadcrumb.
We have a number of different places that a Postman Echo Collection could be 
My apologies as I am still learning.
Here is the link, I hope 
Let me know if thats correct.
I believe that this image shows a 401 becuase there are 2 Authorization headers set.
If you hover over the Key, it should say that it’s a duplicate and will be overridden. The other headers are in the hidden section.
This is caused by the Authorization tab still being set to Basic Auth. When you set that to No Auth and try the request again it should show the correct 200 code.
Thank you Danny, I really appreciate what you have highlighted to me AND I have even a better understanding of what’s happened because of your input. However, I feel we have digressed. Here’s why.
This tutorial was specifically teaching us about “Basic Auth” - therefore to set it to “No Auth” is defeating the purpose.
What is unclear in this tutorial and not communicated well for learners, like myself, is how to enter the username and password within the “Authorization” tab. See below screen shot:
All I had to do was the following:
Enter the word “postman” in the “username” field and “password” in the “password” field.
What confused me, and I think other people who are just starting out is the following line in the tutorial:

The reason for that is because that information is already present and hidden within the headers tab.
Hence - my original feedback on the Basic Auth tutorial.
I hope this makes sense
Please let me know if it does, or doesn’t because I would like to understand it.