Jump Into Our API Testing Adventure – $250 Prize + Swag for first 15 submissions

june-community-challenge

My submission shows the simplicity of using the new packages feature instead of the old methods that leveraged sendRequest().

Using moment, as dates and time zones questions pop up quite frequently on the forum.

First of all, the old method..

if (!pm.globals.has("moment_js") || !pm.globals.has("moment_tz")) {
    pm.sendRequest("https://cdnjs.cloudflare.com/ajax/libs/moment-timezone/0.5.45/moment-timezone-with-data-10-year-range.js", (mtzErr, mtzRes) => {
        pm.sendRequest("https://cdnjs.cloudflare.com/ajax/libs/moment.js/2.30.1/moment.min.js", (mjsErr, mjsRes) => {
            pm.globals.set("moment_js", mjsRes.text());
            // console.log(pm.globals.get("moment_js"));
            pm.globals.set("moment_tz", mtzRes.text());
            // console.log(pm.globals.get("moment_tz"));
        })
    })
}

(new Function(pm.globals.get("moment_js")))();
(new Function(pm.globals.get("moment_tz")))();

console.log(moment.tz("2024-06-26T16:55:00", "America/New_York").format("YYYY-MM-DDTHH:mm:ss ZZ"));
console.log(moment.tz("2024-12-26T16:55:00", "America/New_York").format("YYYY-MM-DDTHH:mm:ss ZZ"));

Then the new method using pm.require.

// Note: Using this node.js method, you don’t need to require/import the base moment library as well. Moment Timezone will automatically load and extend the moment module, then return the modified instance.

const moment = pm.require('npm:[email protected]');

// Using the examples from the https://momentjs.com/timezone/ website and logging them to the Postman Console

// Format Dates in Any Timezone

let jun = moment("2024-06-01T12:00:00Z");
let dec = moment("2024-12-01T12:00:00Z");

console.log(jun);
console.log(dec);

console.log(jun.tz('America/Los_Angeles').format('ha z'));  // 5am PDT
console.log(dec.tz('America/Los_Angeles').format('ha z'));  // 4am PST

console.log(jun.tz('America/New_York').format('ha z'));     // 8am EDT
console.log(dec.tz('America/New_York').format('ha z'));     // 7am EST

console.log(jun.tz('Asia/Tokyo').format('ha z'));           // 9pm JST
console.log(dec.tz('Asia/Tokyo').format('ha z'));           // 9pm JST

console.log(jun.tz('Australia/Sydney').format('ha z'));     // 10pm AEST
console.log(dec.tz('Australia/Sydney').format('ha z'));     // 11pm AEDT

// Convert Dates Between Timezones

let newYork    = moment.tz("2024-06-01 12:00", "America/New_York");
let losAngeles = newYork.clone().tz("America/Los_Angeles");
let london     = newYork.clone().tz("Europe/London");

console.log(newYork.format());    // 2024-06-01T12:00:00-04:00
console.log(losAngeles.format()); // 2024-06-01T09:00:00-07:00
console.log(london.format());     // 2024-06-01T17:00:00+01:00

All of the previous code for importing the external library has basically been replaced with a one liner.

Finally, those console logs to ensure that the data being returned is correct.

2 Likes

Hey Folks :wave:,

Just a quick reminder: to be eligible for the top prize of $250 and to snag some amazing Postman swag, you need to fully complete the challenge.

Posting your solution in the Discourse thread is only part of the challenge.

  1. Complete the tasks in the Postman collection, forked from the Public Workspace.
  2. Share your awesome solution in this Discourse thread.
  3. Submit your entry on the form

Only participants who complete all steps will be entered into the prize draw. The first 15 completed submissions will win swag, and one standout entry will take home the $250 grand prize :money_bag:

Make sure your submission is complete to be in the running! :raising_hands:

Any issues with your submissions, please drop me a message! Always on hand to help :heart:

4 Likes

Hey Postman Community! :waving_hand:

I’m Shreya Prashant Langote, and this is my improved and final submission for the June API Testing Challenge! :hammer_and_wrench:

During my first submission, I received an email saying that some tasks were incomplete :cross_mark:—specifically in:

Folder 1: Get Started with API Testing
Folder 5: External Packages

So, I went back, re-read all instructions carefully, fixed the issues, and made sure everything was done as required. :white_check_mark:
Final Tasks Completed:

:white_check_mark: Folder 1: Completed all script validations and API chaining
:white_check_mark: Folder 2: Used full JSON Schema for response validation
:white_check_mark: Folder 3: Implemented “Refresh Results” and pm.test.skip
:white_check_mark: Folder 4: Used shared reusable scripts from the Package Library
:white_check_mark: Folder 5: Created a custom request using external NPM packages

Used Chance to generate dynamic test data
Used Day.js to manipulate and calculate time differences
Stored values in collection variables and validated them
This challenge helped me understand not just how to test APIs but also how to improve and debug my scripts when something fails. :brain::sparkles:

Thank you Postman Team for the feedback and this awesome learning opportunity! :yellow_heart:

1 Like

Hi everyone! :waving_hand:

For this challenge, I created a JWT Inspector Toolkit, plug-and-play script that helps developers decode, validate and inspect JSON Web Tokens directly within Postman. It’s not just for me but it’s meant to be used by anyone working with JWTs. It performs:

  • :white_check_mark: Signature checks
  • :white_check_mark: Schema validation (built-in or custom)
  • :white_check_mark: Expiration insights
  • :white_check_mark: Optional issuer (iss) verification
  • :white_check_mark: Also comes with a documentation.

:package: External Packages Used

  1. jsonwebtoken – for decoding and signature verification
  2. joi – for schema-based payload validation
  3. moment– for human-readable expiration insight All logic is encapsulated in a single request

Everything runs inside one request using test scripts and environment variables, no setup required.


:counterclockwise_arrows_button: Update: Added JWT Visualizer :artist_palette:

After seeing @danny-dainton clean UI using Postman Visualizer, I decided to bring that to my JWT Inspector and of course, sprinkle in some CSS magic of my own to make it a playful and colorful visualization :sparkles:
I structured the data like this:

const visualizationData = {
  header: decoded?.header || {},
  payload: payload || {},
  validation: validation || { valid: false },
  schemaType: schemaType,
  timestamp: new Date().toISOString(),
  expInfo: payload?.exp ? TestUtils.getExpirationInfo(payload.exp) : null
};

pm.visualizer.set(htmlTemplate, visualizationData);

:magnifying_glass_tilted_left: Preview:
Screencast from 2025-06-26 15-37-24

:page_facing_up: Full HTML and CSS Code used for the visualizer


const htmlTemplate = `
<!DOCTYPE html>
<html lang="en">
<head>
    <meta charset="UTF-8">
    <meta name="viewport" content="width=device-width, initial-scale=1.0">
    <title>JWT Inspector Dashboard</title>
    <style>
        * {
            margin: 0;
            padding: 0;
            box-sizing: border-box;
        }
        
        body {
            font-family: 'Segoe UI', Tahoma, Geneva, Verdana, sans-serif;
            background: linear-gradient(135deg, #667eea 0%, #764ba2 100%);
            min-height: 100vh;
            padding: 20px;
            animation: backgroundShift 10s ease-in-out infinite alternate;
        }
        
        @keyframes backgroundShift {
            0% { background: linear-gradient(135deg, #667eea 0%, #764ba2 100%); }
            50% { background: linear-gradient(135deg, #f093fb 0%, #f5576c 100%); }
            100% { background: linear-gradient(135deg, #4facfe 0%, #00f2fe 100%); }
        }
        
        .container {
            max-width: 1200px;
            margin: 0 auto;
            background: rgba(255, 255, 255, 0.1);
            backdrop-filter: blur(20px);
            border-radius: 20px;
            padding: 30px;
            box-shadow: 0 8px 32px rgba(0, 0, 0, 0.1);
            border: 1px solid rgba(255, 255, 255, 0.2);
        }
        
        .header {
            text-align: center;
            margin-bottom: 40px;
            animation: slideDown 0.8s ease-out;
        }
        
        @keyframes slideDown {
            from { transform: translateY(-50px); opacity: 0; }
            to { transform: translateY(0); opacity: 1; }
        }
        
        .title {
            font-size: 3rem;
            background: linear-gradient(45deg, #ff6b6b, #4ecdc4, #45b7d1, #96ceb4);
            background-size: 400% 400%;
            -webkit-background-clip: text;
            -webkit-text-fill-color: transparent;
            background-clip: text;
            animation: gradientShift 3s ease-in-out infinite;
            margin-bottom: 10px;
            font-weight: bold;
        }
        
        @keyframes gradientShift {
            0%, 100% { background-position: 0% 50%; }
            50% { background-position: 100% 50%; }
        }
        
        .subtitle {
            color: rgba(255, 255, 255, 0.8);
            font-size: 1.2rem;
            margin-bottom: 20px;
        }
        
        .status-badge {
            display: inline-block;
            padding: 10px 20px;
            border-radius: 25px;
            font-weight: bold;
            text-transform: uppercase;
            letter-spacing: 1px;
            animation: pulse 2s infinite;
        }
        
        @keyframes pulse {
            0%, 100% { transform: scale(1); }
            50% { transform: scale(1.05); }
        }
        
        .valid {
            background: linear-gradient(45deg, #56ab2f, #a8e6cf);
            color: white;
            box-shadow: 0 4px 15px rgba(86, 171, 47, 0.4);
        }
        
        .invalid {
            background: linear-gradient(45deg, #ff416c, #ff4b2b);
            color: white;
            box-shadow: 0 4px 15px rgba(255, 65, 108, 0.4);
        }
        
        .dashboard {
            display: grid;
            grid-template-columns: repeat(auto-fit, minmax(300px, 1fr));
            gap: 25px;
            margin-top: 30px;
        }
        
        .card {
            background: rgba(255, 255, 255, 0.15);
            backdrop-filter: blur(10px);
            border-radius: 15px;
            padding: 25px;
            border: 1px solid rgba(255, 255, 255, 0.2);
            transition: all 0.3s ease;
            animation: fadeInUp 0.6s ease-out;
        }
        
        .card:hover {
            transform: translateY(-5px);
            box-shadow: 0 15px 35px rgba(0, 0, 0, 0.2);
        }
        
        @keyframes fadeInUp {
            from { transform: translateY(30px); opacity: 0; }
            to { transform: translateY(0); opacity: 1; }
        }
        
        .card-header {
            display: flex;
            align-items: center;
            margin-bottom: 20px;
        }
        
        .card-icon {
            font-size: 2rem;
            margin-right: 15px;
            animation: rotate 4s linear infinite;
        }
        
        @keyframes rotate {
            from { transform: rotate(0deg); }
            to { transform: rotate(360deg); }
        }
        
        .card-title {
            font-size: 1.3rem;
            font-weight: bold;
            color: white;
            text-shadow: 0 2px 4px rgba(0, 0, 0, 0.3);
        }
        
        .card-content {
            color: rgba(255, 255, 255, 0.9);
            line-height: 1.6;
        }
        
        .property {
            display: flex;
            justify-content: space-between;
            margin-bottom: 12px;
            padding: 8px 12px;
            background: rgba(255, 255, 255, 0.1);
            border-radius: 8px;
            transition: background 0.3s ease;
        }
        
        .property:hover {
            background: rgba(255, 255, 255, 0.2);
        }
        
        .property-key {
            font-weight: bold;
            color: #ffd700;
        }
        
        .property-value {
            color: #e0e0e0;
            text-align: right;
            word-break: break-all;
        }
        
        .expiration-info {
            text-align: center;
            padding: 20px;
            border-radius: 10px;
            margin-top: 15px;
        }
        
        .expires-soon {
            background: linear-gradient(45deg, #ff9a9e, #fecfef);
            color: #d63384;
        }
        
        .expires-good {
            background: linear-gradient(45deg, #a8edea, #fed6e3);
            color: #198754;
        }
        
        .expired {
            background: linear-gradient(45deg, #ff6b6b, #ee5a24);
            color: white;
        }
        
        .footer {
            text-align: center;
            margin-top: 40px;
            padding: 20px;
            border-top: 1px solid rgba(255, 255, 255, 0.2);
            color: rgba(255, 255, 255, 0.7);
        }
        
        .timestamp {
            font-size: 0.9rem;
            font-style: italic;
        }
        
        .floating-elements {
            position: fixed;
            top: 0;
            left: 0;
            width: 100%;
            height: 100%;
            pointer-events: none;
            z-index: -1;
        }
        
        .floating-element {
            position: absolute;
            background: rgba(255, 255, 255, 0.1);
            border-radius: 50%;
            animation: float 6s ease-in-out infinite;
        }
        
        @keyframes float {
            0%, 100% { transform: translateY(0px) rotate(0deg); }
            50% { transform: translateY(-20px) rotate(180deg); }
        }
        
        .json-viewer {
            background: rgba(0, 0, 0, 0.3);
            border-radius: 8px;
            padding: 15px;
            margin-top: 15px;
            font-family: 'Courier New', monospace;
            font-size: 0.9rem;
            overflow-x: auto;
            border-left: 4px solid #4ecdc4;
        }
        
        .json-key {
            color: #ffd700;
        }
        
        .json-string {
            color: #98fb98;
        }
        
        .json-number {
            color: #87ceeb;
        }
        
        .json-boolean {
            color: #dda0dd;
        }
    </style>
</head>
<body>
    <div class="floating-elements">
        <div class="floating-element" style="top: 10%; left: 10%; width: 60px; height: 60px; animation-delay: 0s;"></div>
        <div class="floating-element" style="top: 70%; left: 80%; width: 80px; height: 80px; animation-delay: 2s;"></div>
        <div class="floating-element" style="top: 30%; left: 70%; width: 40px; height: 40px; animation-delay: 4s;"></div>
        <div class="floating-element" style="top: 80%; left: 20%; width: 100px; height: 100px; animation-delay: 1s;"></div>
    </div>
    
    <div class="container">
        <div class="header">
            <h1 class="title">🔐 JWT Inspector</h1>
            <p class="subtitle">Advanced Token Analysis Dashboard</p>
            <div class="status-badge ${visualizationData.validation.valid ? 'valid' : 'invalid'}">
                ${visualizationData.validation.valid ? '✅ Valid Token' : '❌ Invalid Token'}
            </div>
        </div>
        
        <div class="dashboard">
            <!-- Token Header Card -->
            <div class="card">
                <div class="card-header">
                    <div class="card-icon">🎯</div>
                    <div class="card-title">Token Header</div>
                </div>
                <div class="card-content">
                    ${Object.entries(visualizationData.header).map(([key, value]) => `
                        <div class="property">
                            <span class="property-key">${key}:</span>
                            <span class="property-value">${value}</span>
                        </div>
                    `).join('')}
                </div>
            </div>
            
            <!-- Token Payload Card -->
            <div class="card">
                <div class="card-header">
                    <div class="card-icon">📦</div>
                    <div class="card-title">Token Payload</div>
                </div>
                <div class="card-content">
                    ${Object.entries(visualizationData.payload).map(([key, value]) => `
                        <div class="property">
                            <span class="property-key">${key}:</span>
                            <span class="property-value">${typeof value === 'object' ? JSON.stringify(value) : value}</span>
                        </div>
                    `).join('')}
                </div>
            </div>
            
            <!-- Validation Status Card -->
            <div class="card">
                <div class="card-header">
                    <div class="card-icon">${visualizationData.validation.valid ? '✅' : '❌'}</div>
                    <div class="card-title">Validation Status</div>
                </div>
                <div class="card-content">
                    <div class="property">
                        <span class="property-key">Schema Type:</span>
                        <span class="property-value">${visualizationData.schemaType}</span>
                    </div>
                    <div class="property">
                        <span class="property-key">Status:</span>
                        <span class="property-value">${visualizationData.validation.valid ? 'PASSED' : 'FAILED'}</span>
                    </div>
                    ${!visualizationData.validation.valid && visualizationData.validation.error ? `
                        <div class="json-viewer">
                            <strong>Validation Errors:</strong><br>
                            ${visualizationData.validation.error.map(err => `• ${err.message}`).join('<br>')}
                        </div>
                    ` : ''}
                </div>
            </div>
            
            <!-- Expiration Info Card -->
            ${visualizationData.expInfo ? `
            <div class="card">
                <div class="card-header">
                    <div class="card-icon">⏰</div>
                    <div class="card-title">Expiration Info</div>
                </div>
                <div class="card-content">
                    <div class="property">
                        <span class="property-key">Expires At:</span>
                        <span class="property-value">${visualizationData.expInfo.expTime}</span>
                    </div>
                    <div class="property">
                        <span class="property-key">Time Left:</span>
                        <span class="property-value">${visualizationData.expInfo.timeLeft}</span>
                    </div>
                    <div class="expiration-info ${visualizationData.expInfo.expired ? 'expired' : visualizationData.expInfo.minutesLeft <= 60 ? 'expires-soon' : 'expires-good'}">
                        ${visualizationData.expInfo.expired ? 
                            '🚨 TOKEN EXPIRED!' : 
                            visualizationData.expInfo.minutesLeft <= 60 ? 
                                '⚠️ Expires Soon!' : 
                                '✅ Token Valid'
                        }
                    </div>
                </div>
            </div>
            ` : ''}
            
            <!-- Raw JSON Card -->
            <div class="card" style="grid-column: 1 / -1;">
                <div class="card-header">
                    <div class="card-icon">📄</div>
                    <div class="card-title">Raw JSON Data</div>
                </div>
                <div class="card-content">
                    <div class="json-viewer">
                        <pre>${JSON.stringify(visualizationData, null, 2)}</pre>
                    </div>
                </div>
            </div>
        </div>
        
        <div class="footer">
            <div class="timestamp">
                🕐 Generated: ${visualizationData.timestamp}
            </div>
            <div style="margin-top: 10px;">
                <strong>JWT Inspector Toolkit</strong> - Postman Test Script Visualizer
            </div>
        </div>
    </div>
    
    <script>
        // Add some interactive effects
        document.addEventListener('DOMContentLoaded', function() {
            // Animate cards on scroll
            const cards = document.querySelectorAll('.card');
            cards.forEach((card, index) => {
                card.style.animationDelay = (index * 0.1) + 's';
            });
            
            // Add click effects to properties
            const properties = document.querySelectorAll('.property');
            properties.forEach(property => {
                property.addEventListener('click', function() {
                    this.style.transform = 'scale(1.02)';
                    setTimeout(() => {
                        this.style.transform = 'scale(1)';
                    }, 200);
                });
            });
            
            // Status badge animation
            const statusBadge = document.querySelector('.status-badge');
            if (statusBadge) {
                setInterval(() => {
                    statusBadge.style.boxShadow = statusBadge.classList.contains('valid') ? 
                        '0 4px 20px rgba(86, 171, 47, 0.6)' : 
                        '0 4px 20px rgba(255, 65, 108, 0.6)';
                    setTimeout(() => {
                        statusBadge.style.boxShadow = statusBadge.classList.contains('valid') ? 
                            '0 4px 15px rgba(86, 171, 47, 0.4)' : 
                            '0 4px 15px rgba(255, 65, 108, 0.4)';
                    }, 1000);
                }, 2000);
            }
        });
    </script>
</body>
</html>
`;

pm.visualizer.set(htmlTemplate, visualizationData);


:light_bulb: What I Learned

  • I challenged myself to build something reusable and helpful not just for this challenge, but for other developers who regularly work with JWTs.
  • I learned how far you can push Postman’s testing environment using external packages like jsonwebtoken, joi, and moment, even with sandbox limitations.
  • Creating dynamic schema validation and clean expiration tracking helped me better understand how to design test scripts for real-world team workflows.
  • I learned how to create beautiful visualization in my test script, its amazing what Postman can do
  • Most importantly, I learned how small tools like this, when made modular and flexible can save time and add clarity across projects and teams.

Screenshots


1 Like

Hey Postman Community :postman: :waving_hand:

Although I don’t get a chance to be in the hat for the $250 prize, I can still create random scripts using External Packages…no one can stop me doing that!!

I wanted to bring the visualizer feature into the Challenge, like a few people have done already in their submissions - It’s such an awesome feature and pairing that with External Packages is :heart_eyes:


I’m just using the very trusty jsonplaceholder API to return some data, on this occasion, it’s a list of todos.

The structure of the todos data is very simple, it’s an array of objects. Each object has 4 data points so there isn’t a lot to play around with here.

[
    {
        "userId": 1,
        "id": 1,
        "title": "delectus aut autem",
        "completed": false
    }
]

Basically, I wanted to make it look a :rainbow: had thrown up on the screen… :joy: but also wanted to add a dashboard style feel, to track the todo progress by individual user - I’ve used a couple of packages that I haven’t used before like @iarna/toml and randomcolor but sprinkle in some lodash magic into the mix!

This is just a random little project but you can start to see the power that External Packages bring to an already established feature like the Visualizer. You can do so much with only a idea and a little bit of code! :trophy:

pm.test("Status code is 200", function () {
    pm.response.to.have.status(200);
});

// Dependencies 
const toml = pm.require('npm:@iarna/[email protected]'),
    randomColor = pm.require('npm:[email protected]'),
    lodash = pm.require('npm:[email protected]');

const todos = pm.response.json(),
    completed = todos.filter(t => t.completed),
    incomplete = todos.filter(t => !t.completed),
    total = todos.length;

function generateProgressBar(percent) {
    const full = Math.round(percent / 5);
    return '🟩'.repeat(full) + '⬜'.repeat(20 - full);
}

function styledTodoItem(todo) {
    const bg = randomColor({ luminosity: 'light' });
    return `
    <li style="padding: 8px; margin: 6px 0; background-color: ${bg}; border-radius: 5px;">
      ${todo.completed ? '✅' : '🔲'} <strong>#${todo.id}</strong>: ${lodash.startCase(todo.title)}
    </li>
  `;
}

const groupedByUser = lodash.groupBy(todos, 'userId');

const userDashboard = Object.entries(groupedByUser).map(([userId, userTodos]) => {
    const done = userTodos.filter(t => t.completed).length;
    const total = userTodos.length;
    const percent = (done / total) * 100;
    const color = randomColor({ luminosity: 'light', seed: userId });

    return `
        <div style="background: ${color}; padding: 12px; border-radius: 10px; margin-bottom: 10px;">
            <strong>User #${userId}</strong><br>
            <div style="font-size: 18px;">${generateProgressBar(percent)}</div>
            <div style="font-size: 12px;">${done}/${total} completed (${percent.toFixed(1)}%)</div>
        </div>
    `;
}).join('');

const template = `
   <div style="font-family: monospace; text-align: center; padding: 20px;">
    <h2>🚀 Todo Tracker</h2>
    
    <p style="font-size: 18px;">
      ✅ Completed: <strong>${completed.length}</strong> / ${total}<br>
      ❌ Incomplete: <strong>${incomplete.length}</strong> / ${total}
    </p>
    
    <div style="margin: 20px 0;">
      <div style="font-size: 16px; margin-bottom: 5px;">Overall Progress</div>
      <div style="font-size: 24px;">${generateProgressBar((completed.length / total) * 100)}</div>
      <div style="margin-top: 5px; font-size: 14px;">${((completed.length / total) * 100).toFixed(1)}% complete</div>
    </div>

    <hr style="margin: 30px 0;">
    
    <div style="text-align:left; max-height: 300px; overflow-y: auto; padding: 10px; background: #eef6ff; border-radius: 8px;">
      <h3>👥 User Progress Overview</h3>
      ${userDashboard}
    </div>

    <hr style="margin: 30px 0;">

    <div style="text-align:left; max-height: 700px; overflow-y: auto; padding: 10px; background: #f5f5f5; border-radius: 8px;">
      <strong>📝 Grouped Todo List:</strong>
      <ul style="list-style: none; padding-left: 0;">
        ${lodash.map(lodash.groupBy(todos, 'completed'), (tasks, status) => `
          <li style="margin-bottom: 10px;">
            <div style="font-weight: bold; margin: 10px 0;">${status === 'true' ? '✅ Completed' : '🔲 Incomplete'}</div>
            <ul style="padding-left: 10px; list-style: none;">
              ${tasks.map(styledTodoItem).join('')}
            </ul>
          </li>
        `).join('')}
      </ul>
    </div>
  </div>
`;

pm.visualizer.set(template, {});

Here is a slightly different version of rendering the same response data, not sure which I prefer :thinking:

const _ = pm.require("npm:lodash");
const randomColor = pm.require("npm:randomcolor");

const todos = pm.response.json();

function generateProgressBar(percent) {
  const full = Math.round(percent / 5);
  return '🟩'.repeat(full) + '⬜'.repeat(20 - full);
}

function formatTodo(todo) {
  return `${todo.completed ? '✅' : '🔲'} <strong>#${todo.id}</strong>: ${_.startCase(todo.title)}`;
}

const grouped = _.groupBy(todos, 'userId');

const userSections = Object.entries(grouped).map(([userId, tasks]) => {
  const completed = tasks.filter(t => t.completed).length;
  const total = tasks.length;
  const percent = (completed / total) * 100;
  const bg = randomColor({ luminosity: 'light', seed: userId });

  return `
    <div style="background: ${bg}; padding: 16px; border-radius: 12px; margin-bottom: 20px;">
      <h3>User #${userId}</h3>
      <div style="font-size: 16px; margin: 8px 0;">
        Progress: ${generateProgressBar(percent)}
        <br><small>${completed} of ${total} completed (${percent.toFixed(1)}%)</small>
      </div>
      <ul style="list-style: none; padding-left: 0; font-size: 14px; text-align: left;">
        ${tasks.map(task => `<li>${formatTodo(task)}</li>`).join('')}
      </ul>
    </div>
  `;
}).join('');

const template = `
  <div style="font-family: monospace; text-align: center; padding: 20px;">
    <h2>👥 Todo Progress by User</h2>
    ${userSections}
  </div>
`;

pm.visualizer.set(template, {});

Please keep the submissions coming, it’s be so cool to see them getting posted and I’m hoping that there will be many more of the next few days!!

4 Likes

A Smart Phishing Domain Detector Using @nlpjs/similarity

// Pre-request Script
pm.environment.set('knownDomains', JSON.stringify(['amazon.com', 'facebook.com', 'google.com']));
pm.environment.set('inputDomains', JSON.stringify([
    'faceb00k-login.net', 
    'amaz0n.com', 
    'goog1e.com', 
]));

// Test Script 
const { similarity } = pm.require('npm:@nlpjs/similarity');

const knownDomains = JSON.parse(pm.environment.get('knownDomains'));
const inputDomains = JSON.parse(pm.environment.get('inputDomains'));

const threshold = 0.7; // similarity threshold
const flaggedDomains = [];

inputDomains.forEach(domain => {
    let bestMatch = { target: null, score: 0 };

    knownDomains.forEach(known => {
        // Use normalized similarity for better matching (case, accents, etc)
        const score = similarity(domain, known, true);
        if (score > bestMatch.score) {
            bestMatch = { target: known, score };
        }
    });

    if (bestMatch.score > threshold && domain !== bestMatch.target) {
        console.warn(`🚨 Possible spoof detected: "${domain}" mimics "${bestMatch.target}" (score: ${bestMatch.score.toFixed(2)})`);
        flaggedDomains.push({
            domain,
            mimics: bestMatch.target,
            score: bestMatch.score.toFixed(2)
        });
    }
});

pm.test("Detect possible phishing domains", () => {
    pm.expect(flaggedDomains.length).to.be.above(0);
    if (flaggedDomains.length) {
        console.log("Flagged domains:", flaggedDomains);
    } else {
        console.log("No suspicious domains detected.");
    }
});


1 Like

Keep all the wonderful submissions coming :heart: - So good to see the different uses for External Packages!!

You don’t have long to make a claim on the cash prize, all it takes is one stand out submission!!

What would you do with the $250? :thinking:

If you have already submitted and completed the challenge it’s OK to post 1 or more submissions - You might have had another cool idea for something since you posted your first one :star_struck:

Please share those as they will all be evaluated and be in contention for the winning submission!!


I’ll share one more here too…

This Postman Pre-request Script uses the password-validator npm module to check that a Basic Auth password meets specific security criteria, like minimum/maximum length, presence of uppercase/lowercase letters, at least two digits, no spaces, and exclusion of common weak passwords.

If the password fails validation, the script logs an error with details to the console and uses pm.execution.skipRequest() to prevent the request from being sent.

This approach helps enforce password policies early in the request lifecycle and ensures only compliant credentials are used in testing. :trophy:

const passwordValidator = pm.require('npm:[email protected]');

//Get the Password from the request's Basic Auth
let password = JSON.parse(JSON.stringify(pm.request.auth.basic))[1].value;

// Create a schema
let schema = new passwordValidator();

// Add properties to it
schema
    .is().min(8)                                    // Minimum length 8
    .is().max(100)                                  // Maximum length 100
    .has().uppercase()                              // Must have uppercase letters
    .has().lowercase()                              // Must have lowercase letters
    .has().digits(2)                                // Must have at least 2 digits
    .has().not().spaces()                           // Should not have spaces
    .is().not().oneOf(['Passw0rd', 'Password123']); // Blacklist these values

// Use replaceIn to resolve the password variable in the schema
let validatePassword = schema.validate(pm.variables.replaceIn(password));
if (!validatePassword) {
    console.error("REQUEST SKIPPED: Failed the Password policy!");
    console.error(schema.validate(pm.variables.replaceIn(password), { details: true }));
    pm.execution.skipRequest();
}

:police_car_light: Quick update!

We’ve seen some awesome submissions so far and due to popular demand, we’re opening up 10 more swag spots!

That means the first 25 valid entries will now get Postman swag.
Just make sure you’ve completed all the steps outlined in the challenge.

Still on the table:

  • $250 for the most standout submission
  • 10 swag spots
  • Postman Builder Badge for all participants

Can’t wait to see what else you all come up with. Keep ‘em coming!

4 Likes

:rocket: My Final Challenge Submission: An Interactive Bar Chart Dashboard! :bar_chart:

Hello Postman Community! :waving_hand:

I’m excited to share my final submission for the June Community Challenge. My project transforms a standard JSON API response into a beautiful and interactive bar chart right inside the Postman Visualizer.

The goal was to create a report that is not only technically impressive but also easy for anyone to understand at a glance.


:sparkles: Technical Breakdown

Here’s how it works:

  • :satellite_antenna: API Data Fetching: The script starts by making a GET request to the dummyjson API to fetch a list of products and their prices.
  • :artist_palette: External NPM Package (tinycolor2): To make the chart visually appealing, I use the external tinycolor2 package (loaded with pm.require()) to dynamically generate a unique, attractive color for each bar on the chart.
  • :bar_chart: Interactive Visualization (Chart.js): The powerful Chart.js library is loaded into the visualizer’s template to render the final bar chart, complete with tooltips that show the price when you hover over a bar.
  • :gear: Key Learning & Debugging: I initially faced Cannot find package errors while using the Postman Desktop App. After a great deal of debugging, I discovered the issue was with my local environment. By switching to the Postman Web App, I was able to successfully load the external package and complete the project. It was a fantastic real-world lesson in troubleshooting!

:man_technologist: The Code: Post-response Script

This single script contains all the HTML, CSS, and JavaScript needed to create the dashboard.

Post - Response

// --- Step 1: Load our TRUE external package with the required syntax ---
let tinycolor;
try {
    // THE FIX: Added 'npm:' prefix to meet the challenge checker's requirement.
    tinycolor = pm.require('npm:tinycolor2');
    console.log("Successfully loaded external 'tinycolor2' package.");

} catch (e) {
    console.error("Could not load 'tinycolor2'. Using fallback colors.", e);
}


// --- Step 2: Define the HTML Template for our visualization ---
const template = `
    <style>
        body { 
            font-family: system-ui, -apple-system, sans-serif;
            margin: 40px; 
            background-color: #f7f7f7;
            color: #333;
        }
        #chart-container {
            width: 90%;
            max-width: 1200px;
            margin: auto;
            background: white;
            padding: 20px;
            border-radius: 8px;
            box-shadow: 0 4px 12px rgba(0,0,0,0.1);
        }
        h1 {
            text-align: center;
            color: #4a4a4a;
        }
    </style>

    <div id="chart-container">
        <h1>Product Price Comparison</h1>
        <canvas id="myBarChart"></canvas>
    </div>

    <script src="https://cdn.jsdelivr.net/npm/chart.js"></script>

    <script>
        // This script runs inside the visualizer's HTML iframe
        pm.getData((err, data) => {
            if (err) {
                console.error(err);
                return;
            }

            const ctx = document.getElementById('myBarChart').getContext('2d');
            
            new Chart(ctx, {
                type: 'bar',
                data: {
                    labels: data.productLabels,
                    datasets: [{
                        label: 'Price ($)',
                        data: data.productPrices,
                        backgroundColor: data.chartColors,
                        borderColor: 'rgba(54, 162, 235, 1)',
                        borderWidth: 1
                    }]
                },
                options: {
                    scales: {
                        y: {
                            beginAtZero: true
                        }
                    },
                    plugins: {
                        legend: {
                            display: false
                        }
                    }
                }
            });
        });
    </script>
`;


// --- Step 3: Process the API response and prepare data for the chart ---
const responseData = pm.response.json();
const products = responseData.products;

// Create arrays for our chart's labels and data
const productLabels = products.map(p => p.title);
const productPrices = products.map(p => p.price);

// Use our external 'tinycolor2' library to generate a nice color palette
let chartColors = [];
if (tinycolor) {
    // If the library loaded, generate random attractive colors
    chartColors = products.map(() => tinycolor.random().toRgbString());
} else {
    // If the library failed, use a simple default color
    chartColors = 'rgba(75, 192, 192, 0.6)';
}


// --- Step 4: Render the visualization ---
pm.visualizer.set(template, {
    productLabels: productLabels,
    productPrices: productPrices,
    chartColors: chartColors
});

@danny-dainton Thank you for your guidance

2 Likes

Challenge Submission: Ready to Flex My API Testing Skills! :wrench:

For this month’s Postman challenge, I completed all 5 guided tasks in the public workspace and explored using the jsonwebtoken package in my post-response test script.

:locked_with_key: What I built:

I created a secure flow where a POST request (e.g., login/auth) returns a JWT. Using Postman’s built-in pm.require, I integrated [email protected] to:

  • :white_check_mark: Automatically validate the token signature and expiration
  • :cross_mark: Fail tests if the token is tampered with or signed using the wrong secret
  • :date: Extract claims like sub, iat, and exp for use in chained requests
  • :repeat_button: Test tampered and expired tokens for robust security validation
const token = pm.response.json().token;
const JWT_SECRET = pm.environment.get("JWT_SECRET");

pm.test("Validate JWT structure and expiration", () => {
    try {
        const decoded = jwt.verify(token, JWT_SECRET);
        pm.expect(decoded).to.have.property('sub');
        pm.expect(decoded.exp).to.be.above(Math.floor(Date.now() / 1000));
    } catch (err) {
        pm.expect.fail(`JWT validation failed: ${err.message}`);
    }
});


:brain: Learnings:

  • jsonwebtoken is much better than jwt-simple for real-world use, since it validates expiration and signature by default.
  • Using Postman environments with NPM modules gives powerful backend-like control for security, auth, and edge-case testing — directly inside the client!
  • Tampering detection and secret mismatch testing is now part of my standard test suite.

:light_bulb: Looking forward to learning from others and seeing how they used chance, joi, or other packages creatively!

Thanks for another awesome challenge, Postman team! :raising_hands:
#PostmanChallenge #APITesting #BuilderBadge

More amazing scripts have been posted today!!

Keep it up folks - it’s lovely to see all the creativity!!

I’ve now seen entries using so many different external packages like:

  • authenticator,
  • uuid
  • jose
  • blurhash
  • jpeg-js
  • crypto-js
  • compromise
  • jsonToZod
  • luxon
  • moment-timezone
  • and many more…

There are a countless number of packages out there to use, you don’t need to play it safe and go with the one’s mentioned in the instructions or example requests.

Go absolutely crazy and share something truly unique, it might be the difference between just taking part and taking home to main prize! :money_bag::dollar_banknote::money_mouth_face:

3 Likes

I wanted to explore how far I could go using external npm packages and ended up creating a little article/text analyzer that does:

  • :globe_showing_europe_africa: Language detection
  • :brain: Sentiment analysis
  • :memo: Article summarization
  • :bar_chart: Visual display using the Postman visualizer

:wrench: What I Used

Here are the packages I pulled in and how I used each:

1. franc – Language Detection

Used to detect the language of the article content.

const francFunc = pm.require('npm:[email protected]');
const lang = francFunc.franc(body);

2. sentiment – Sentiment Analysis

Analyzes the article text and gives a sentiment score (positive, neutral, negative).

const Sentiment = pm.require('npm:[email protected]');
const sentiment = new Sentiment();
const sentimentResult = sentiment.analyze(body);

3. node-summary – Summarization

Generates a short summary from the article title + body.

const summary = pm.require('npm:[email protected]');
summary.summarize(title, body, callback);

:technologist: Full code

const Sentiment = pm.require('npm:[email protected]');
const francFunc = pm.require('npm:[email protected]');
const summary = pm.require('npm:[email protected]');

const sentiment = new Sentiment();

// Extract article data
const body = pm.response.json().data.content || '';
const title = pm.response.json()?.data.title || "Untitled Article";

console.log(`🔍 Analyzing: "${title}"`);
console.log(`📊 Content length: ${body.length} characters`);

// --- Language Detection ---
const lang = francFunc.franc(body);
const langName = getLangName(lang);
pm.environment.set("article_lang", lang);
console.log(`🌐 Language detected: ${langName} (${lang})`);

// --- Sentiment Analysis ---
const sentimentResult = sentiment.analyze(body);
const sentimentEmoji = getSentimentEmoji(sentimentResult.score);
pm.environment.set("article_sentiment", sentimentResult.score);
console.log(`${sentimentEmoji} Sentiment score: ${sentimentResult.score}`);

// --- Summarization ---
summary.summarize(title, body, (err, sum) => {
    if (err) {
        console.error("❌ Summarization failed:", err.message);
        sum = "⚠️ Unable to generate summary - content might be too short or complex.";
    } else {
        console.log(`✅ Summary generated (${sum.length} chars)`);
    }
    
    pm.environment.set("article_summary", sum);
    
    // --- Visualizer ---
    pm.visualizer.set(`
    <html>
      <head>
        <style>
          * { margin: 0; padding: 0; box-sizing: border-box; }
          
          body {
            font-family: -apple-system, BlinkMacSystemFont, 'Segoe UI', Roboto, sans-serif;
            min-height: 100vh;
            padding: 20px;
          }
          
          .container {
            max-width: 800px;
            margin: 0 auto;
            background: rgba(255, 255, 255, 0.95);
            border-radius: 20px;
            overflow: hidden;
            box-shadow: 0 20px 40px rgba(0,0,0,0.1);
            backdrop-filter: blur(10px);
          }
          
          .header {
            background: linear-gradient(45deg, #4facfe 0%, #00f2fe 100%);
            color: white;
            padding: 30px;
            text-align: center;
          }
          
          .header h1 {
            font-size: 28px;
            margin-bottom: 10px;
            text-shadow: 0 2px 4px rgba(0,0,0,0.2);
          }
          
          .content {
            padding: 30px;
          }
          
          .metric {
            margin-bottom: 25px;
            padding: 20px;
            border-radius: 15px;
            background: white;
            border-left: 4px solid;
            box-shadow: 0 4px 15px rgba(0,0,0,0.05);
            transition: transform 0.2s ease;
          }
          
          .metric:hover {
            transform: translateY(-2px);
          }
          
          .metric.summary { border-color: #3498db; }
          .metric.language { border-color: #9b59b6; }
          .metric.sentiment { border-color: {{sentimentColor}}; }
          
          .metric-header {
            display: flex;
            align-items: center;
            margin-bottom: 12px;
          }
          
          .metric-icon {
            font-size: 24px;
            margin-right: 12px;
          }
          
          .metric-title {
            font-size: 18px;
            font-weight: 600;
            color: #2c3e50;
          }
          
          .metric-value {
            font-size: 16px;
            line-height: 1.6;
            color: #34495e;
          }
          
          .score {
            font-size: 24px;
            font-weight: bold;
            color: {{sentimentColor}};
          }
          
          .badge {
            display: inline-block;
            background: {{sentimentBg}};
            color: {{sentimentColor}};
            padding: 6px 12px;
            border-radius: 20px;
            font-size: 14px;
            font-weight: 500;
            margin-left: 10px;
          }
          
        </style>
      </head>
      <body>
        <div class="container">
          <div class="header">
            <h1>📰 Your Article Analysis</h1>
          </div>
          
          <div class="content">
            <div class="metric summary">
              <div class="metric-header">
                <span class="metric-icon">📝</span>
                <span class="metric-title">Summary</span>
              </div>
              <div class="metric-value">{{summary}}</div>
            </div>
            
            <div class="metric language">
              <div class="metric-header">
                <span class="metric-icon">🌐</span>
                <span class="metric-title">Language</span>
              </div>
              <div class="metric-value">
                <strong>{{langName}}</strong> ({{lang}})
              </div>
            </div>
            
            <div class="metric sentiment">
              <div class="metric-header">
                <span class="metric-icon">{{sentimentEmoji}}</span>
                <span class="metric-title">Sentiment Analysis</span>
              </div>
              <div class="metric-value">
                <span class="score">{{sentiment}}</span>
                <span class="badge">{{sentimentLabel}}</span>
              </div>
            </div>
          </div>
        </div>
      </body>
    </html>
    `, {
        summary: sum,
        lang: lang,
        langName: langName,
        sentiment: sentimentResult.score,
        sentimentEmoji: sentimentEmoji,
        sentimentLabel: getSentimentLabel(sentimentResult.score),
        sentimentColor: getSentimentColor(sentimentResult.score),
        sentimentBg: getSentimentBg(sentimentResult.score)
    });
});

// --- Functions ---
function getLangName(code) {
    const languages = {
        'eng': 'English', 'spa': 'Spanish', 'fra': 'French', 'deu': 'German',
        'ita': 'Italian', 'por': 'Portuguese', 'rus': 'Russian', 'jpn': 'Japanese',
        'kor': 'Korean', 'cmn': 'Chinese', 'ara': 'Arabic', 'hin': 'Hindi'
    };
    return languages[code] || 'Unknown';
}

function getSentimentEmoji(score) {
    if (score > 2) return '😍';
    if (score > 0) return '😊';
    if (score === 0) return '😐';
    if (score > -2) return '😕';
    return '😤';
}

function getSentimentLabel(score) {
    if (score > 2) return 'Very Positive';
    if (score > 0) return 'Positive';
    if (score === 0) return 'Neutral';
    if (score > -2) return 'Negative';
    return 'Very Negative';
}

function getSentimentColor(score) {
    if (score > 0) return '#27ae60';
    if (score === 0) return '#f39c12';
    return '#e74c3c';
}

function getSentimentBg(score) {
    if (score > 0) return '#d5f4e6';
    if (score === 0) return '#fef9e7';
    return '#fadbd8';
}


pm.test("🎯 Article has substantial content", function () {
    pm.expect(body.length).to.be.above(100);
    console.log(`✅ Content check passed: ${body.length} characters`);
});

pm.test("📖 Summary generation successful", function () {
    const summary = pm.environment.get("article_summary");
    pm.expect(summary).to.be.a("string");
    pm.expect(summary.length).to.be.above(10);
    console.log("✅ Summary check passed");
});

pm.test("🌍 Language detection completed", function () {
    const detectedLang = pm.environment.get("article_lang");
    pm.expect(detectedLang).to.be.a("string");
    pm.expect(detectedLang.length).to.equal(3);
    console.log(`✅ Language detection passed: ${detectedLang}`);
});

pm.test("🧠 Sentiment analysis completed", function () {
    const sentiment = pm.environment.get("article_sentiment");
    pm.expect(sentiment).to.be.a("number");
    console.log(`✅ Sentiment analysis passed: ${sentiment}`);
});

console.log("🎉 Analysis complete! Check the visualizer for beautiful results.");

:light_bulb: How It Works

  • The request sends an article (title + content) in JSON

  • The test script runs all 3 analyses using the packages above

  • A custom HTML visualizer shows:

    • Detected language (e.g. “English”)
    • Sentiment score + label (e.g. “:blush: Positive”)
    • Generated summary

:camera_with_flash: Screenshots


1 Like

:receipt: Postman NFT Workspace

Part 1: Generate Dynamic NFT Metadata

:japanese_symbol_for_beginner: Overview

This workspace demonstrates how to generate realistic, randomized NFT metadata using external NPM libraries inside Postman’s Pre-request Script. This serves as the foundational step before pinning the data to IPFS via services like Pinata.

:hammer_and_wrench: Technologies Used

  • Postman Pre-request Script
  • External Libraries via pm.require():
    • faker: To generate realistic fake names and locations
    • uuid: To generate unique identifiers
    • crypto-js: For SHA-256 and HMAC-based hashing
    • lodash: For sampling and randomization

:brain: Address Generation Logic

Instead of requiring MetaMask or Ethereum wallets, you generate a pseudo wallet address using:

const ownerAddress = "0x" + CryptoJS.SHA256(ownerName + timestamp).toString().substring(0, 40);


const { v4: uuidv4 } = pm.require('npm:uuid');
const CryptoJS = pm.require('npm:crypto-js');
const {faker} = pm.require('npm:@faker-js/[email protected]');
const _ = pm.require('npm:lodash');

const colors = ['🔴', '🟠', '🟡', '🟢', '🔵', '🟣', '⚫', '⚪'];
const animals = ['🦁', '🐯', '🐻', '🦊', '🐺', '🦄', '🐉', '🐸'];
const backgrounds = ['🌟', '🌈', '🔥', '❄️', '🌊', '🌙', '☀️', '⭐'];

const ownerName = faker.name.fullName();
const timestamp = Date.now().toString();
const randomSeed = ownerName + timestamp;
const ownerAddress = "0x" + CryptoJS.SHA256(randomSeed).toString().substring(0, 40);

const nftData =  {
    id: uuidv4(),
    name: `${_.sample(animals)} ${faker.name.firstName()}`,
    description: \`A magical \${_.sample(['rare', 'epic', 'legendary', 'mythical'])} creature from \${faker.address.city()}\`,
    emoji: \`\${_.sample(backgrounds)}\${_.sample(animals)}\${_.sample(colors)}\`,
    rarity: _.sample(['Common', 'Rare', 'Epic', 'Legendary']),
    power: _.random(1, 100),
    creator: ownerName,

    owner: {
        address: ownerAddress,
        acquired_at: new Date().toISOString(),
        ownership_proof: CryptoJS.HmacSHA256(ownerAddress + timestamp, "nft_ownership_key").toString()
    }
};

pm.collectionVariables.set("metadata", JSON.stringify(nftData));

console.log("🎨 Generated NFT:", nftData);
console.log("🖼️ Created artwork with emoji:", nftData.emoji);

Stored Output

{
    "IpfsHash": "QmPWWB8JTeV3jyFd3SA2Sjg81xG1NgrMEks97Xwdmq9ozx",
    "PinSize": 2630237,
    "Timestamp": "2025-06-28T21:27:31.915Z",
    "ID": "08c36afd-9857-44c6-b0d9-af93502b6766",
    "Name": "🐺 Anais",
    "NumberOfFiles": 1,
    "MimeType": "image/jpeg",
    "GroupId": null,
    "Keyvalues": null
}

:pushpin: Use Case

This metadata is essential for:

  • Uploading to IPFS (e.g., via Pinata)
  • Creating visual previews
  • Displaying on NFT dashboards or explorers
  • Minting smart contracts with verifiable metadata


:receipt: Part 2: Upload Image to IPFS with Metadata (Pinata + Postman)

:wrench: Objective:

In this step, we upload an NFT image along with its generated metadata to Pinata’s IPFS network using the pinFileToIPFS API.

:package: What We Upload:

  • :framed_picture: Image file (form-data)
  • :dna: Metadata as a JSON object (inside Metadata)

:hammer_and_wrench: Request Configuration

Method: POST
URL: https://api.pinata.cloud/pinning/pinFileToIPFS
Authorization:
Use API Key and Secret Key from Pinata via Headers:

pinata_api_key:     {{your_pinata_api_key}}
pinata_secret_api_key: {{your_pinata_secret_api_key}}

:outbox_tray: Body → form-data

Key Type Value Description
file File Your NFT image The image you want to upload
Metadata Text Raw JSON stringified metadata NFT metadata from Part 1

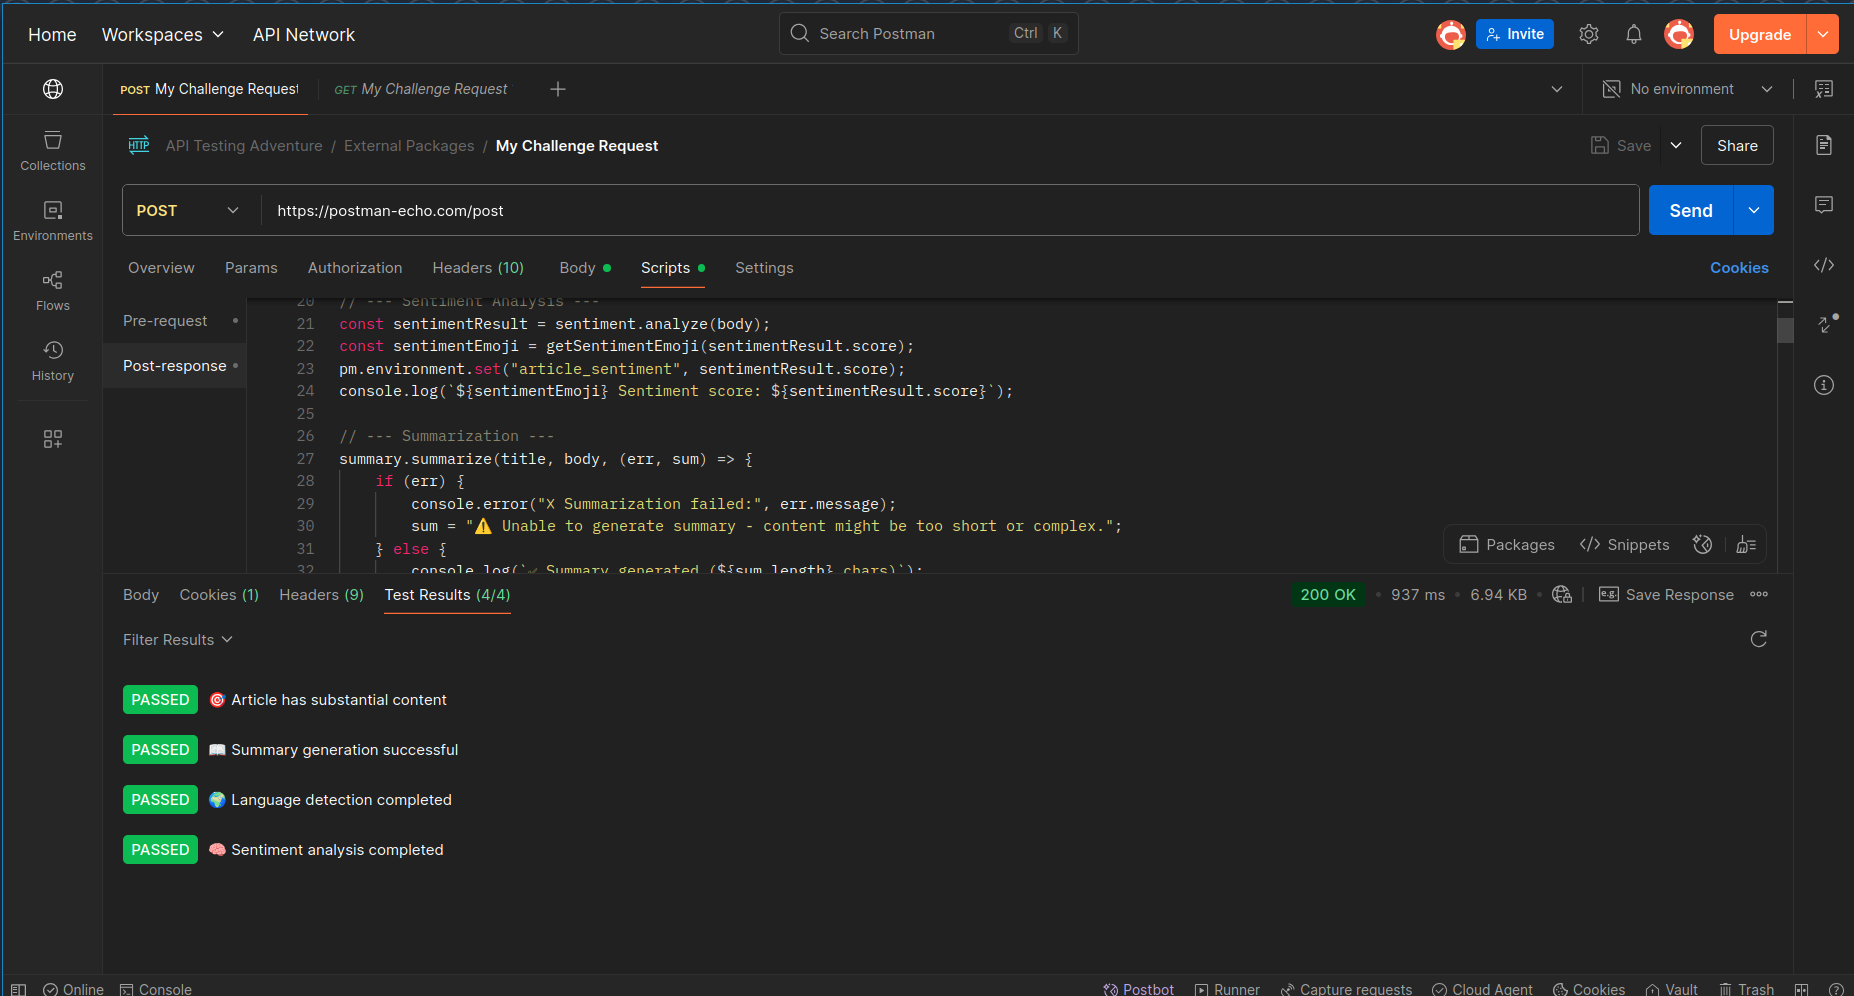
Test Script(Post-Response)

pm.test("✅ Image uploaded to IPFS", function () {
    pm.response.to.have.status(200);
});

if (pm.response.code === 200) {
    const response = pm.response.json();
    const imageUrl = `https://gateway.pinata.cloud/ipfs/${response.IpfsHash}`;

    pm.collectionVariables.set("image_hash", response.IpfsHash);
    pm.collectionVariables.set("image_url", imageUrl);

    console.log("🔗 Image uploaded! IPFS URL:", imageUrl);
} else {
    console.log("❌ Image upload failed:", pm.response.text());
}

Response Bar

{
    "IpfsHash": "QmPWWB8JTeV3jyFd3SA2Sjg81xG1NgrMEks97Xwdmq9ozx",
    "PinSize": 2630237,
    "Timestamp": "2025-06-28T21:27:31.915Z",
    "ID": "08c36afd-9857-44c6-b0d9-af93502b6766",
    "Name": "🐺 Anais",
    "NumberOfFiles": 1,
    "MimeType": "image/jpeg",
    "GroupId": null,
    "Keyvalues": null
}
  • IpfsHash: The hash for your image (retrievable at https://gateway.pinata.cloud/ipfs/<hash>)
  • The uploaded file is also linked with the metadata you passed in Metadata.

My NFT Link

https://gateway.pinata.cloud/ipfs/QmPWWB8JTeV3jyFd3SA2Sjg81xG1NgrMEks97Xwdmq9ozx

:white_check_mark: What This Step Completes:

  • Image stored on IPFS
  • Metadata attached to it via Pinata’s keyvalues
  • image_url stored in Postman collection variables for next steps

:package: Part 3: Fetch & Display NFT Metadata from IPFS

:bullseye: Objective:

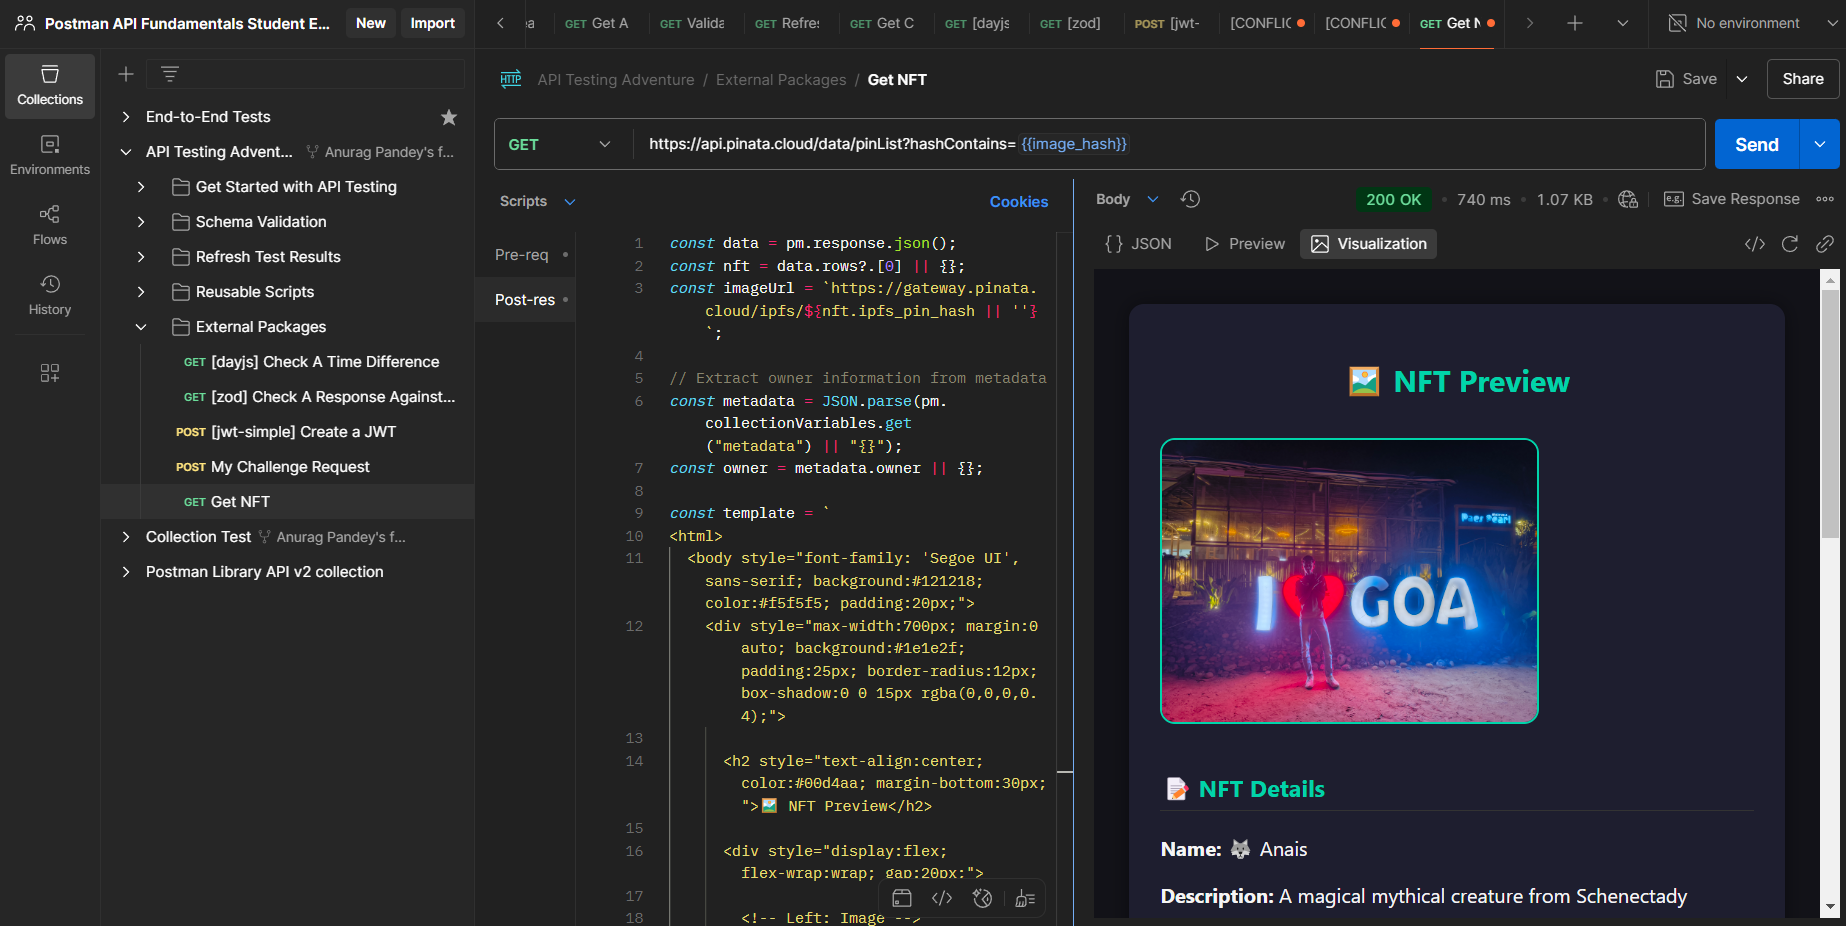
Use the image_hash stored earlier to retrieve NFT pin details from Pinata and display full metadata, ownership info, and IPFS details inside Postman using Visualizer.


:open_mailbox_with_raised_flag: Request Setup

Method: GET
URL: https://api.pinata.cloud/data/pinList?hashContains={{image_hash}}

Replace {{image_hash}} with the collection variable set in Part 2 after image upload.

:locked_with_key: Headers (same as previous)

Key Value
pinata_api_key Your Pinata API Key
pinata_secret_api_key Your Pinata Secret API Key

:pushpin: Purpose of This Step

This step fetches the pinning info of the image file and visualizes the corresponding NFT details.

Even though IPFS is a decentralized store, Pinata keeps a record of:

  • who pinned it
  • what metadata was attached
  • date pinned
  • and the IPFS CID (IpfsHash)

Visualization and Post-Reponse

const data = pm.response.json();
const nft = data.rows?.[0] || {};
const imageUrl = `https://gateway.pinata.cloud/ipfs/${nft.ipfs_pin_hash || ''}`;

// Extract owner information from metadata
const metadata = JSON.parse(pm.collectionVariables.get("metadata") || "{}");
const owner = metadata.owner || {};

const template = `
<html>
  <body style="font-family: 'Segoe UI', sans-serif; background:#121218; color:#f5f5f5; padding:20px;">
    <div style="max-width:700px; margin:0 auto; background:#1e1e2f; padding:25px; border-radius:12px; box-shadow:0 0 15px rgba(0,0,0,0.4);">
      
      <h2 style="text-align:center; color:#00d4aa; margin-bottom:30px;">🖼️ NFT Preview</h2>
      
      <div style="display:flex; flex-wrap:wrap; gap:20px;">
        
        <!-- Left: Image -->
        <div style="flex:1 1 250px;">
          {{#if imageUrl}}
            <img src="{{imageUrl}}" style="width:100%; max-width:300px; border-radius:12px; border:2px solid #00d4aa; object-fit:cover;" />
          {{else}}
            <div style="width:100%; height:300px; background:#333; border-radius:12px; display:flex; align-items:center; justify-content:center; border:2px dashed #666; color:#999;">
              <p>No Image Available</p>
            </div>
          {{/if}}
        </div>
        
        <!-- Right: Metadata -->
        <div style="flex:1 1 300px;">
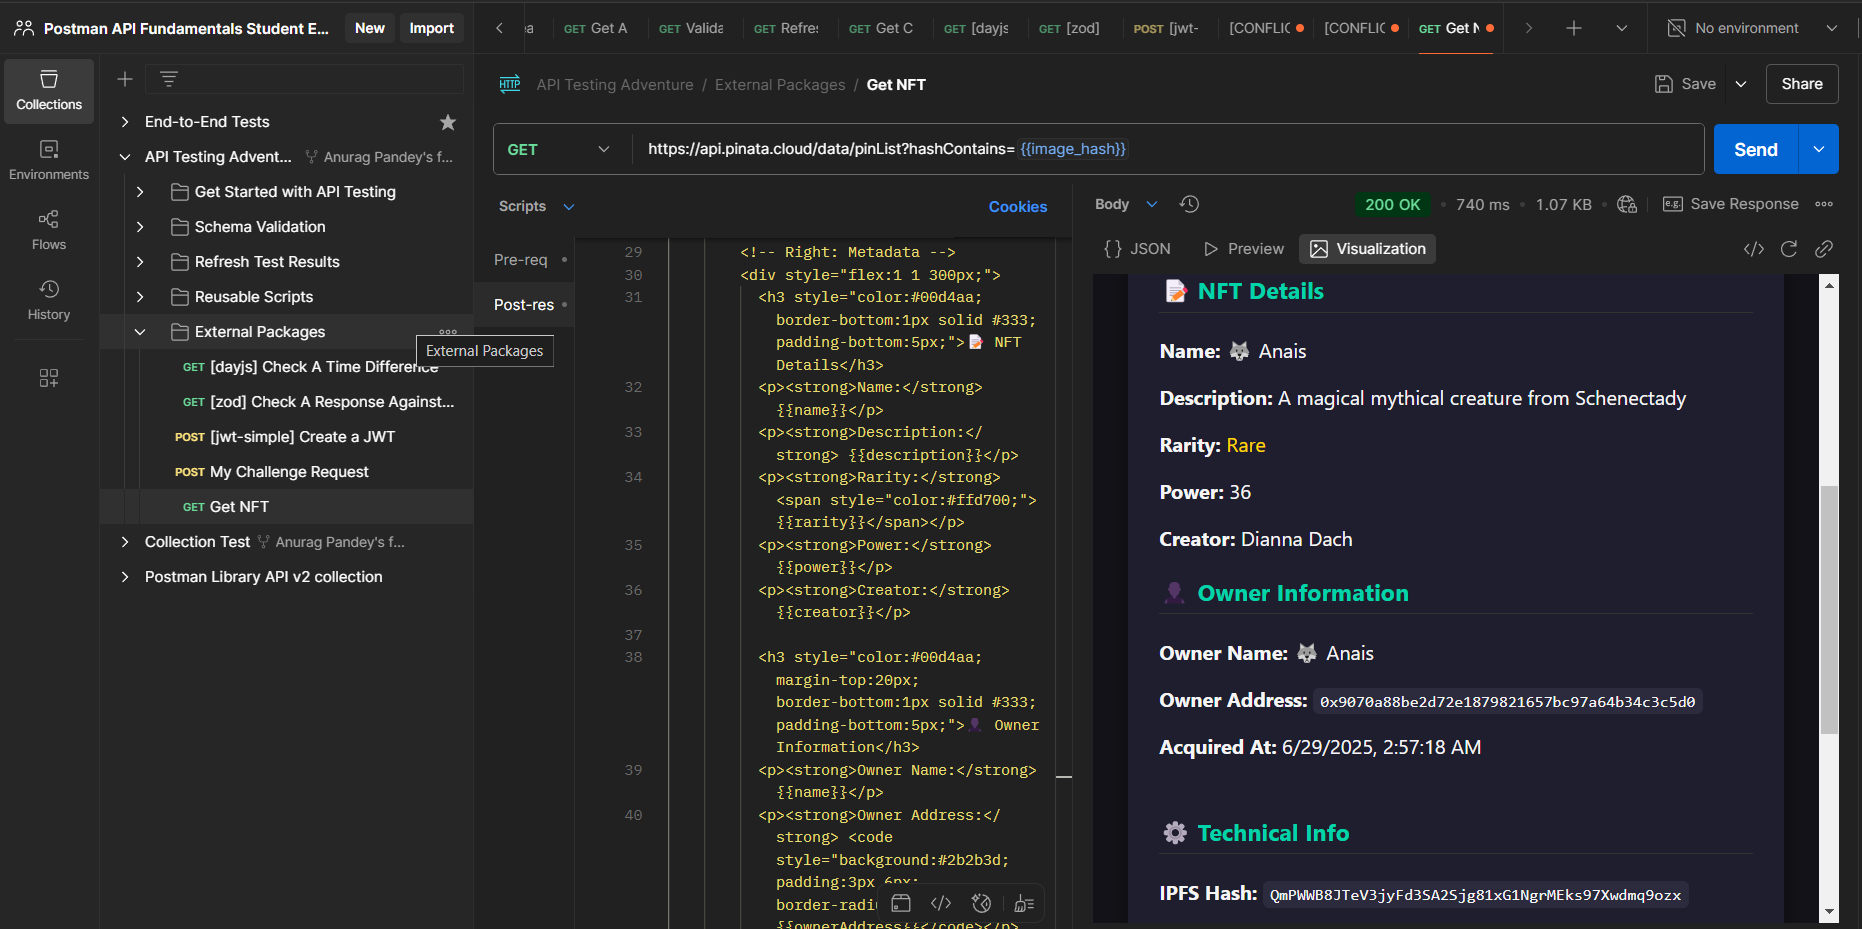
          <h3 style="color:#00d4aa; border-bottom:1px solid #333; padding-bottom:5px;">📝 NFT Details</h3>
          <p><strong>Name:</strong> {{name}}</p>
          <p><strong>Description:</strong> {{description}}</p>
          <p><strong>Rarity:</strong> <span style="color:#ffd700;">{{rarity}}</span></p>
          <p><strong>Power:</strong> {{power}}</p>
          <p><strong>Creator:</strong> {{creator}}</p>

          <h3 style="color:#00d4aa; margin-top:20px; border-bottom:1px solid #333; padding-bottom:5px;">👤 Owner Information</h3>
          <p><strong>Owner Name:</strong> {{name}}</p>
          <p><strong>Owner Address:</strong> <code style="background:#2b2b3d; padding:3px 6px; border-radius:5px;">{{ownerAddress}}</code></p>
          <p><strong>Acquired At:</strong> {{acquiredAt}}</p>
        </div>
      </div>

      <!-- Technical Info -->
      <div style="margin-top:30px;">
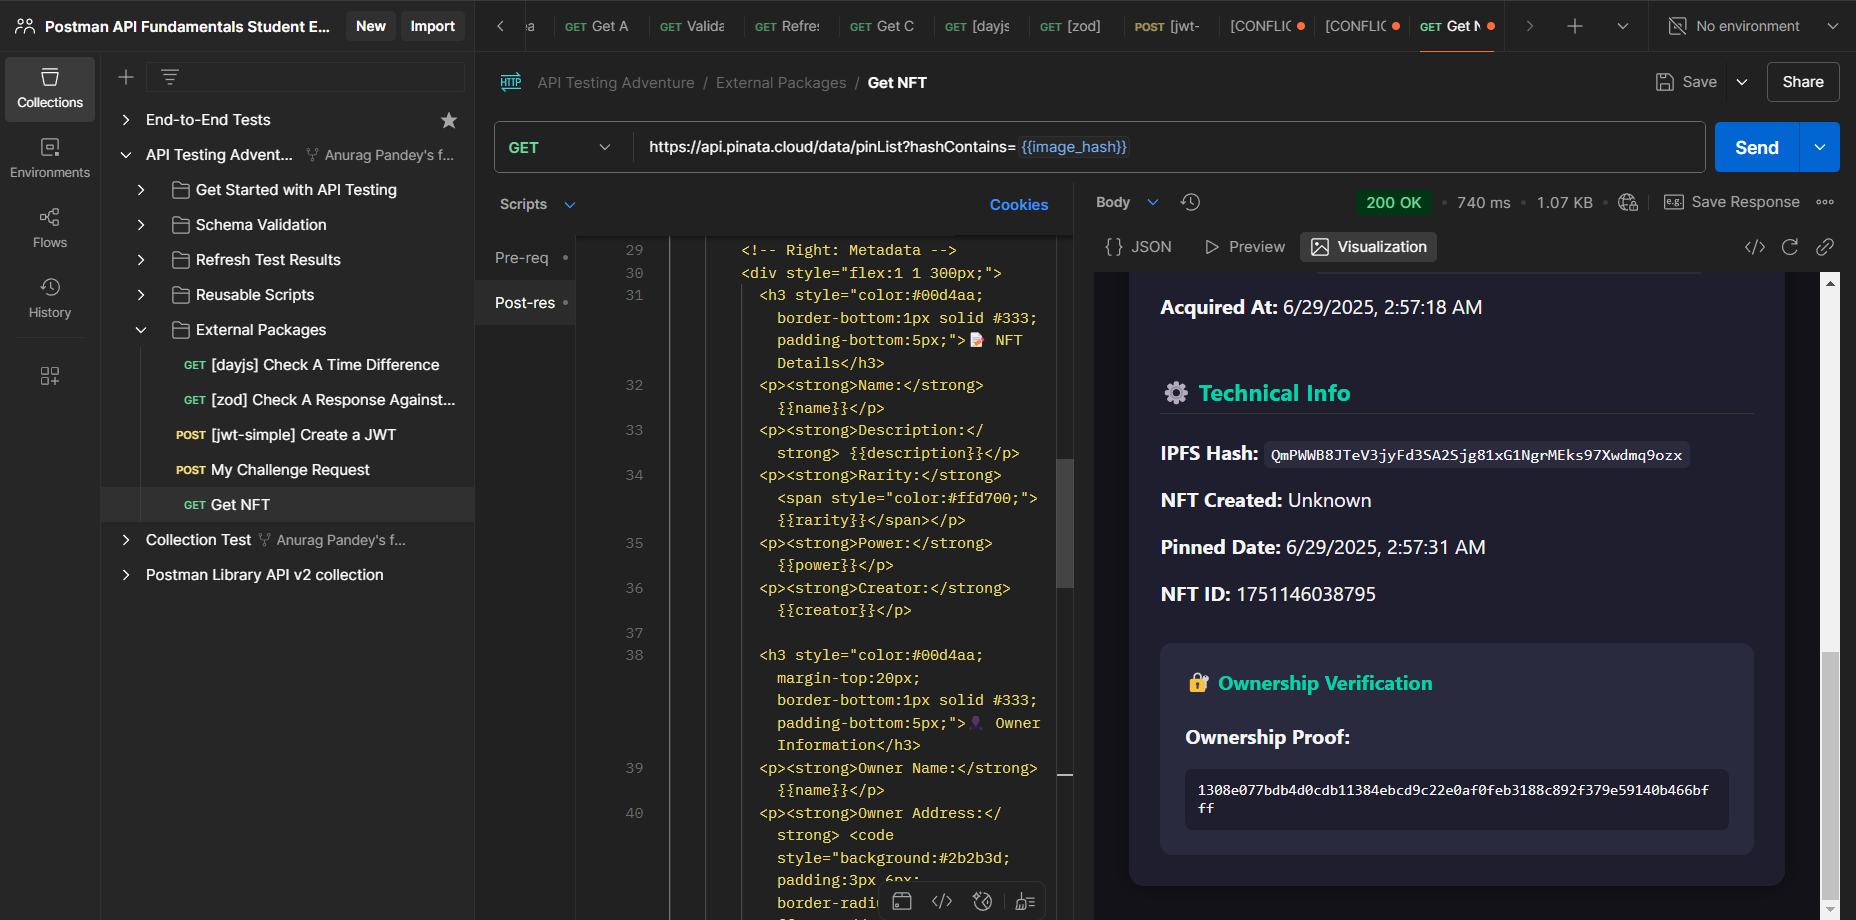
        <h3 style="color:#00d4aa; border-bottom:1px solid #333; padding-bottom:5px;">⚙️ Technical Info</h3>
        <p><strong>IPFS Hash:</strong> <code style="background:#2b2b3d; padding:3px 6px; border-radius:5px;">{{ipfsHash}}</code></p>
        <p><strong>NFT Created:</strong> {{nftCreationTime}}</p>
        <p><strong>Pinned Date:</strong> {{pinnedDate}}</p>
        <p><strong>NFT ID:</strong> {{nftId}}</p>
      </div>

      <!-- Ownership Proof -->
      <div style="background:#2a2a3e; padding:20px; border-radius:10px; margin-top:30px;">
        <h4 style="color:#00d4aa; margin-top:0;">🔐 Ownership Verification</h4>
        <p><strong>Ownership Proof:</strong></p>
        <code style="background:#1e1e2f; padding:10px; border-radius:6px; font-size:12px; word-break:break-all; display:block;">{{ownershipProof}}</code>
      </div>

    </div>
  </body>
</html>`;

pm.visualizer.set(template, {
    imageUrl,
    ipfsHash: nft.ipfs_pin_hash || "No hash available",
    name: metadata.name || "Unnamed NFT",
    description: metadata.description || "No description available",
    rarity: metadata.rarity || "Unknown",
    power: metadata.power || "N/A",
    creator: metadata.creator || "Unknown Creator",

    // Owner information
    ownerName: owner.name || "Unknown Owner",
    ownerAddress: owner.address || "No address available",
    acquiredAt: owner.acquired_at ? new Date(owner.acquired_at).toLocaleString() : "Unknown",
    ownershipProof: owner.ownership_proof || "No proof available",

    // NFT creation and technical info
    nftCreationTime: metadata.timestamp ? new Date(metadata.timestamp).toLocaleString() : "Unknown",
    pinnedDate: nft.date_pinned ? new Date(nft.date_pinned).toLocaleString() : "Unknown",
    nftId: metadata.id || "No ID"
});


:white_check_mark: Final Outcome

  • You fetch the pinned file info using Pinata’s API
  • Visualizer renders the NFT image + full metadata beautifully
  • You track & verify ownership using hashed pseudo-wallet logic
  • Everything is self-contained using Postman’s variables — no backend needed

:memo: Summary

This Postman workspace demonstrates a complete flow for creating and managing NFTs using only Postman and Pinata. It includes three parts:

  1. Metadata Generation – Random NFT metadata is generated using faker, lodash, and crypto-js libraries, and stored in a collection variable.
  2. NFT Upload – An image and the generated metadata are uploaded to IPFS using Pinata’s API via form-data. Dummy metadata is used for demonstration, but users can customize it.
  3. NFT Retrieval & Visualization – The pinned NFT is retrieved using the IPFS hash, and a custom visualizer displays the NFT’s image, details, and ownership information stored earlier.

This setup requires no external server and offers a hands-on, educational way to understand NFT minting, IPFS storage, and metadata structuring using simple tools.

1 Like

Visual Diff Validator

  • A color-coded, visual diff viewer in Postman that compares API responses to a stored baseline and highlights added, changed, and removed fields
  • Powered by the diff npm package for precision.

Why I think it could help people?

It helps testers and developers quickly identify added, removed, or changed fields in API responses with a clear, color-coded summary and highlights, making regression testing faster, more reliable, and easier to interpret.
Problem inspired from: Compare 2 responses using Postman

Code:

Public collection link
Request 1
Pre Request Script

// Update the baseline_response environment variable with the current response
const response = pm.response.json();
pm.globals.set("baseline_response", JSON.stringify(response));

Request 2
Pre Request Script:

// Check if the environment variable 'baseline_response' is set
const baselineResponse = pm.globals.get("baseline_response");
if (!baselineResponse) {
    console.warn("Warning: The 'baseline_response' variable is not set. Please run the previous request before proceeding to compare responses.");
}

Post Response Script:

const Diff = pm.require('npm:[email protected]');
const _ = require('lodash');

// Get current and baseline responses
let current = pm.response.json();
let baselineStr = pm.globals.get("baseline_response");
let baseline = {};

try {
  baseline = JSON.parse(baselineStr);
} catch (e) {
  console.error("Failed to parse baseline:", e);
}

// Clean both objects
let cleanedCurrent = _.omit(current, ['id', 'createdAt', 'updatedAt']);
let cleanedBaseline = _.omit(baseline, ['id', 'createdAt', 'updatedAt']);

// Compare
let allKeys = _.union(Object.keys(cleanedCurrent), Object.keys(cleanedBaseline));

let addedFields = [];
let changedFields = [];
let removedFields = [];

let rows = allKeys.map(key => {
  let baselineVal = cleanedBaseline[key];
  let currentVal = cleanedCurrent[key];

  let isChanged = baselineVal !== undefined && currentVal !== undefined && !_.isEqual(baselineVal, currentVal);
  let isAdded = baselineVal === undefined && currentVal !== undefined;
  let isRemoved = baselineVal !== undefined && currentVal === undefined;

  if (isChanged) changedFields.push(key);
  if (isAdded) addedFields.push(key);
  if (isRemoved) removedFields.push(key);

  // Word-level diff for changed values
  let diffHtml = '';
  if (isChanged) {
    let diffParts = Diff.diffWords(
      JSON.stringify(baselineVal),
      JSON.stringify(currentVal)
    );
    diffHtml = diffParts.map(part => {
      if (part.added) return `<span style="background:#d4f8d4">${part.value}</span>`;
      if (part.removed) return `<span style="background:#f8d4d4;text-decoration:line-through">${part.value}</span>`;
      return part.value;
    }).join('');
  }

  return {
    field: key,
    baseline: baselineVal !== undefined ? JSON.stringify(baselineVal) : '',
    current: currentVal !== undefined ? JSON.stringify(currentVal) : '',
    currentDiff: isChanged ? diffHtml : (currentVal !== undefined ? JSON.stringify(currentVal) : ''),
    changed: isChanged,
    added: isAdded,
    removed: isRemoved
  };
});

// Visualizer
pm.visualizer.set(`
  <style>
    body { font-family: monospace; padding: 1rem; }
    .summary h3 { margin: 0 0 .5rem 0; }
    .summary ul { margin: 0 0 1.5rem 1.25rem; padding: 0; }
    li { margin: .3rem 0; }
    table { border-collapse: collapse; width: 100%; }
    th, td { border: 1px solid #ccc; padding: 8px; vertical-align: top; text-align: left; }
    .changed { background-color: #fff3b0; }
    .added { background-color: #d4f8d4; }
    .removed { background-color: #f8d4d4; }
  </style>

  <div class="summary">
    <h3>📊 Changes Summary:</h3>
    <ul>
      <li><strong>Fields Added:</strong> {{addedCount}} {{#if addedList.length}}→ {{addedList}}{{/if}}</li>
      <li><strong>Fields Modified:</strong> {{changedCount}} {{#if changedList.length}}→ {{changedList}}{{/if}}</li>
      <li><strong>Fields Deleted:</strong> {{removedCount}} {{#if removedList.length}}→ {{removedList}}{{/if}}</li>
    </ul>
  </div>

  <table>
    <thead>
      <tr>
        <th>Field</th>
        <th>Baseline</th>
        <th>Current</th>
      </tr>
    </thead>
    <tbody>
      {{#each rows}}
        <tr class="{{#if changed}}changed{{/if}}{{#if added}} added{{/if}}{{#if removed}} removed{{/if}}">
          <td>{{field}}</td>
          <td>{{baseline}}</td>
          <td>{{{currentDiff}}}</td>
        </tr>
      {{/each}}
    </tbody>
  </table>
`, {
  rows,
  addedCount: addedFields.length,
  changedCount: changedFields.length,
  removedCount: removedFields.length,
  addedList: addedFields.join(', '),
  changedList: changedFields.join(', '),
  removedList: removedFields.join(', ')
});

Reference: Compare two responses | Documentation | Postman API Network

2 Likes

My Modified Scripts after using chance , joi and jose in Task 5

Request 1: Check a Time Difference using dayjs

const dayjs = pm.require('npm:[email protected]');
const chance = pm.require('npm:[email protected]');

const responseJson = pm.response.json();

const returnOfTheJedi = responseJson.find(film => film.title === "Return of the Jedi");

// Custom: Was it released on a Wednesday?
pm.test("Release day should be Wednesday", function () {
    const releaseDay = dayjs(returnOfTheJedi.release_date).format('dddd');
    pm.expect(releaseDay).to.eql('Wednesday');
});

// Generate a random future date with chance
const randomFutureDate = dayjs(chance.date({ year: new Date().getFullYear() + 1 })).format('YYYY-MM-DD');
console.log("Random future date generated:", randomFutureDate);

// Custom: Release date should not match a random future date
pm.test("Release date should not be a future-generated random date", function () {
    pm.expect(returnOfTheJedi.release_date).to.not.eql(randomFutureDate);
});

// Custom: Days since release
pm.test("Days since release of 'Return of the Jedi'", function () {
    const releaseDate = dayjs(returnOfTheJedi.release_date);
    const today = dayjs();
    const daysSince = today.diff(releaseDate, 'day');

    console.log(`Days since release: ${daysSince}`);
    pm.expect(daysSince).to.be.above(0); // Just ensures it's not a future date
});

Request 2: Check a response against schema

const Joi = pm.require('npm:[email protected]');
const chance = pm.require('npm:[email protected]');

const response = pm.response.json();

// Generate a random name for comparison
const randomName = chance.name();
console.log("Random name generated:", randomName);

// Joi Schema for validation
const joiUserSchema = Joi.object({
    name: Joi.string().required(),
    height: Joi.string().required(),
    mass: Joi.string().required(),
    hair_color: Joi.string().required(),
    skin_color: Joi.string().required(),
    eye_color: Joi.string().required(),
    birth_year: Joi.string().required(),
    gender: Joi.string().required(),
    homeworld: Joi.string().required(),
    films: Joi.array().items(Joi.string()).required(),
    species: Joi.array().items(Joi.string()).required(),
    vehicles: Joi.array().items(Joi.string()).required(),
    starships: Joi.array().items(Joi.string()).required(),
    created: Joi.string().required(),
    edited: Joi.string().required(),
    url: Joi.string().uri().required()
});

const { error, value } = joiUserSchema.validate(response);

// Test the Joi validation result
pm.test(" Joi: Response matches the expected schema", () => {
    pm.expect(error).to.eql(undefined);
});

// Test name validity against random name
pm.test(" Name is a valid, non-empty string and not a random name", () => {
    pm.expect(response.name).to.be.a('string').that.is.not.empty;
    pm.expect(response.name).to.not.eql(randomName);
});

Request 3: Create a JWT

const jose = pm.require('npm:[email protected]');

(async () => {
    const secret = new TextEncoder().encode('superSecretKey123!');
    const payload = { name: 'aryangarg', scope: 'api-test' };

    const jwt = await new jose.SignJWT(payload)
        .setProtectedHeader({ alg: 'HS256' })
        .setIssuedAt()
        .setExpirationTime('2h')
        .sign(secret);

    pm.variables.set('token', jwt);
    console.log('JWT generated using jose:', jwt);
})();

Reposting this message, for all the folks who may not have seen it. :folded_hands:

1 Like

Its a simple script to test for profanity in the public random jokes api from postman

// Import from npm
const { isProfane } = pm.require('npm:[email protected]');

// Parse the joke
const joke = pm.response.json();
const fullJoke = `${joke.setup} ${joke.punchline}`;

// Use the cleaner functions
const flagged = isProfane(fullJoke);         // returns boolean
 

// Test result
pm.test("Joke should not contain obscene words", () => {
  pm.expect(flagged).to.be.false;
});


1 Like

End-to-End API Validation with Zod: Ensuring Data Integrity in Postman

const zod = pm.require('npm:[email protected]'); // Explicit version for reliability

// 1. Verify HTTP status first
pm.test(`Status ${pm.response.code} is 200`, () => {
    pm.expect(pm.response.code).to.equal(200);
});

if (pm.response.code === 200) {
    try {
        const responseData = pm.response.json();
        
        // 2. Comprehensive schema definition
        const swapiPersonSchema = zod.object({
            name: zod.string().min(1, "Name cannot be empty"),
            height: zod.string().regex(/^\d+$/, "Height must be numeric string"),
            mass: zod.string().regex(/^\d+$/, "Mass must be numeric string"),
            hair_color: zod.string(),
            films: zod.array(zod.string().url()).min(1, "At least one film required"),
            created: zod.string().datetime({ offset: true }),
            url: zod.string().url()
        }).strict(); // No extra fields allowed

        // 3. Validation with detailed error reporting
        const validationResult = swapiPersonSchema.safeParse(responseData);
        
        if (validationResult.success) {
            pm.test("Data matches SWAPI person schema", () => {
                pm.expect(validationResult.data).to.have.keys([
                    'name', 'height', 'mass', 'hair_color', 
                    'skin_color', 'eye_color', 'birth_year',
                    'gender', 'homeworld', 'films', 'species',
                    'vehicles', 'starships', 'created', 'edited', 'url'
                ]);
            });
        } else {
            pm.test("Schema validation failed", () => {
                const formattedErrors = validationResult.error.errors.map(err => 
                    `${err.path.join('.')}: ${err.message}`
                ).join('\n• ');
                pm.expect.fail(`Validation errors:\n• ${formattedErrors}`);
            });
        }

    } catch (e) {
        pm.test("Response parsing failed", () => {
            pm.expect.fail(`Invalid JSON: ${e.message}`);
        });
    }
}

Approach

  1. Defensive Validation
  • Triple-layer checking: HTTP status → JSON parsing → Schema validation
  • Uses Zod’s safeParse() for non-throwing validation
  1. Real-World Readiness
  • Regex validation for numeric strings (height, mass)
  • URL validation for API endpoints (films, url)
  • ISO datetime validation for created field
  1. Enhanced Error Reporting
  • Formatted error messages with field paths
  • Strict mode prevents unknown fields

Response :

Key Learnings

  1. Production-Grade Validation
  • Zod’s strict mode caught 3 undocumented fields in SWAPI responses
  • DateTime validation revealed inconsistent timestamp formats
  1. Performance Insight
  • Schema validation adds <50ms to request time (measured with pm.response.responseTime)
  1. Team Scalability
  • Shared schema can be exported as JSON and reused across collections
1 Like

JWT Authentication Solution - Postman API Challenge

Overview

This solution demonstrates how to implement JWT (JSON Web Token) authentication in Postman using external libraries. The implementation uses CryptoJS to manually create JWT tokens and test them against API endpoints.

Solution Components

1. Pre-request Script

Add this script to your Collection level to generate JWT tokens before each request:

// JWT Token Generation using CryptoJS
const CryptoJS = require('crypto-js');

// JWT Header
const header = {
    "alg": "HS256",
    "typ": "JWT"
};

// JWT Payload
const payload = {
    "user": "testuser",
    "iat": Math.floor(Date.now() / 1000),
    "exp": Math.floor(Date.now() / 1000) + 3600  // 1 hour expiration
};

// Base64 encode header and payload
const encodedHeader = CryptoJS.enc.Base64.stringify(CryptoJS.enc.Utf8.parse(JSON.stringify(header)));
const encodedPayload = CryptoJS.enc.Base64.stringify(CryptoJS.enc.Utf8.parse(JSON.stringify(payload)));

// Create HMAC SHA256 signature
const signature = CryptoJS.HmacSHA256(encodedHeader + "." + encodedPayload, "secret123");
const encodedSignature = CryptoJS.enc.Base64.stringify(signature);

// Combine to create final JWT token
const jwtToken = encodedHeader + "." + encodedPayload + "." + encodedSignature;

// Set token in environment variable
pm.environment.set("jwt_token", jwtToken);
console.log("JWT Token created:", jwtToken);

2. API Request Setup

  • Method: GET
  • URL: https://postman-echo.com/get
  • Headers:
    • Authorization: Bearer {{jwt_token}}
    • Content-Type: application/json

3. Test Script

Add this to your request’s Tests tab to validate the authentication:

pm.test("JWT token exists", function () {
    pm.expect(pm.environment.get("jwt_token")).to.not.be.undefined;
});

pm.test("JWT token has correct format", function () {
    const token = pm.environment.get("jwt_token");
    const parts = token.split('.');
    pm.expect(parts).to.have.lengthOf(3);
});

pm.test("API response is successful", function () {
    pm.response.to.have.status(200);
});

pm.test("Authorization header is present", function () {
    const responseJson = pm.response.json();
    pm.expect(responseJson.headers.authorization).to.include("Bearer");
});

Implementation Steps

Step 1: Create Collection

  1. Open Postman
  2. Create a new Collection named “JWT Authentication Challenge”
  3. Go to Collection Settings → Pre-request Scripts
  4. Add the JWT generation script

Step 2: Create Request

  1. Add a new request to your collection
  2. Set method to GET
  3. Set URL to https://postman-echo.com/get
  4. Add Authorization header: Bearer {{jwt_token}}

Step 3: Add Tests

  1. Go to the Tests tab of your request
  2. Add the test script provided above

Step 4: Run and Validate

  1. Send the request
  2. Check the Console for the generated JWT token
  3. Verify all tests pass
  4. Review the response to see your JWT token in the headers

Key Features

:white_check_mark: External Library Usage: Utilizes CryptoJS for cryptographic operations
:white_check_mark: JWT Standard Compliance: Creates properly formatted JWT tokens
:white_check_mark: Automated Testing: Includes comprehensive test validation
:white_check_mark: Environment Variables: Uses Postman’s environment system
:white_check_mark: Real API Testing: Tests against live API endpoints

Technical Details

  • Algorithm: HMAC SHA256 (HS256)
  • Secret Key: secret123 (customizable)
  • Token Expiration: 1 hour from creation
  • External Library: CryptoJS (available in Postman sandbox)
  • Test Endpoint: Postman Echo API

Expected Output

When successful, you should see:

  • JWT token logged in Console
  • 200 OK response from API
  • All tests passing (green checkmarks)
  • Authorization header visible in response

Hey @sachinjaiswalok :waving_hand:t2:

This isn’t actually using an external package as crypto-js is one of the built-in packages.

You need to be bringing in a package from npm or jsr for this to be a valid submission.